Showing posts with label dessert. Show all posts

Wednesday, September 11, 2013

A Night of Salads


Recently we had some friends over for an evening of salads.  Every family brought a different kind of salad.  One friend brought a green bean salad that was amazing.  Another friend brought a fruit salad, which is always yummy.  My husband and I made an antipasto, but it not in the traditional sense.  I decided to make a big bowl of lettuce with artichoke hearts, chopped red bell pepper, and sliced baby portobello mushrooms.  Then I set out platters with a variety of items so each person could make his/her own antipasto.  I had bowls of black olives, garlic stuffed green olives, and kalamata olives.  I had a platter of sliced cheeses: munster, cheddar, and provolone.  I had a platter of rolled deli meats:  roast beef, honey ham, and turkey.  I had a bowl of carrots and sweet gherkins for the children.  Friends brought fresh tomatoes from a local Community Supported Agriculture (CSA), avocado, and hard boiled eggs.  Once we all assembled our salads, our plates looked like a rainbow of deliciousness.  The food was beautiful, yummy, and healthy.  

Once we finished dinner, I brought out a different kind of salad.  It was still green, but there was nothing healthy about it.  I made a Watergate Salad.  When I was a child, a family friend made this and I fell immediately in love with it.  It is pudding with cool whip, pineapple, and marshmallows.  What could be bad?  I really should be embarrassed posting a recipe like this on here, but it is too good not to share.  Here is my recipe.  I doubled the recipe, because I wanted to have enough for a large group.  This recipe typically serves 6-8 people.

Watergate Salad Recipe

1 small box pistachio pudding mix
1 4-6oz can crushed pineapple and juice
1 8oz container cool whip
1 cup miniature marshmallows

Fold cool whip into the pudding mix.  Then add the crushed pineapple and juice.  Stir in the marshmallows.  Chill for 30 minutes, and then serve.

Next time you go to a pot luck, think about bringing this.  It is so yummy and easy to make.  Enjoy!

<3 Cassidy

Sunday, January 27, 2013

Gluten Free Cheesecake Recipe

Last week was my mother's 70th birthday!  She just moved out to Oregon in December, and my father will be moving here within the week.  My parents live 1/4 of a mile from us now, and I am extremely thankful that they have moved to be closer to us.  Since my father is not here yet, I wanted to make my mother's birthday special.  So, my husband made salmon (per my mother's and son's request) and popcorn shrimp (per my daughter's request).  And we ended the evening with this cheesecake, my mother's favorite dessert.  The kids made some birthday cards, and my son played "Happy Birthday" to her on his guitar.  It was a wonderful evening, and I was so happy to get to spend the special day with her!  Here is my recipe.


Gluten Free Cheesecake
  • 1 cup whole almonds (about 4 ounces)
  • 1 1/4 cups plus 1 1/2 tablespoons sugar
  • 2 tablespoons unsalted butter, softened
  • 2 pounds nuefchatel cream cheese, at room temperature
  • 4 large eggs plus 2 large egg yolks, at room temperature
  • 1/4 cup sour cream
  • 1 teaspoon grated lemon peel
  • 2 teaspoons pure vanilla extract
  • Boiling water, for baking
Preheat the oven to 375 degrees. 

Using a food processor, pulse the almonds and 1 1/2 tablespoons sugar until finely chopped.   Add the butter and pulse until combined.  Press the nut mixture evenly into a 9-inch springform pan.  Bake until the crust is slightly browned, about 10-15 minutes.  Take it out of the oven and lower the oven temperature to 325 degrees.  

While the crust is cooling, place the pan on a long piece of aluminum foil.  Fold the foil up the sides of the pan.  Set it in a large baking dish or roasting pan.  

Using an electric mixer, beat the cream cheese at low speed until it is fluffy for about 1 minute.  Gradually beat in the remaining 1 1/4 cups sugar until smooth and creamy.  It should take 1-2 minutes.  Beat in the eggs and egg yolks 1 at a time, making sure that all of the ingredients are combining well together.  Beat in the sour cream, lemon peel, and vanilla.

Pour the filling into the already baked crust.  Transfer to the oven and pour enough boiling water into the baking dish to reach halfway up the sides of the springform pan.  Bake until the edges are set and the center jiggles slightly.  In my oven, the cheesecake only took 60 minutes, but I have made this before in a different oven and it took 1 hour and 10 minutes.

Turn off the oven, prop the door open slightly and let the cake cool in the oven for 1 hour.  Remove the cake from the water bath and discard the foil.  Let the cake cool completely, then cover and refrigerate for at least 6 hours.  Then serve.

Cook's Notes:  Remember that this recipe calls for 2 pounds of cream cheese, which is 4- 8oz boxes.  I always seems to forget that and have to make a second trip to the grocery store!

This recipe is inspired by a recipe that was in the Rachael Ray Magazine a few years ago, and we fell in love with it.  My husband and I had never made cheesecake, but we thought we would give it a try.  This recipe is easy to follow, and I have never been disappointed the way it turns out.  It is light and fluffy, and the crushed up almonds in the crust blend well with the creamy cheesecake.  It is absolutely delicious!  I hope you enjoy it!

<3 Cassidy

Gluten Free Poke Hole Cake Recipe

Have you ever heard of a Poke Hole Cake?  This is a recipe that my family has been used many times, including for my first birthday.  It is extremely easy to make, and there are lots of opportunities for your children to help.  My kids really wanted to help make a birthday cake for their father, so I decided that this was the perfect recipe.  


Poke Hole Cake

4 cups almond flour
1/2 cup unsweetened cocoa powder
1 teaspoon kosher salt
1 teaspoon baking soda
1 cup honey
4 large eggs
2 tablespoons pure vanilla extract
2 packages instant pudding
1 cup confectioners' sugar
4 cups cold milk

Preheat the oven to 350 degrees.  Grease a 9 x 13 inch pan with crisco and dust with almond flour.

In a large bowl, combine the almond flour, cocoa powder, salt, and baking soda.  Then add the honey, eggs, and vanilla extract.  Mix all of the ingredients together until it has been combined thoroughly.  Scoop the batter into the prepared cake pan.

Bake for 30 minutes, until a knitting needle inserted into the center of the cake comes out clean.  While the cake is still warm, poke holes in the cake with the handle of a wooden spoon throughout the cake.  Ideally, the holes should be about 2 inches apart.  Since my children were the ones who poked the holes, I just made sure that the holes were spread out throughout the whole cake.

After poking holes, mix the pudding mix and sugar together.  Gradually add milk and stir.  Then beat at a low speed for no more than 1 minute.  Pour the pudding over the whole cake, making sure that the pudding fills all of the holes.  Chill the cake for 1 hour and then serve.

Cook's Notes:  My mother used to make this recipe with a cake mix instead of a made from scratch cake.  You could also make this using any flavor you want of cake or pudding.  We are chocolate lovers, so tend to choose chocolate over any other flavors.

So, get your kids in the kitchen and have some fun baking!  They will feel so proud when they get to share what they made.

<3 Cassidy  


Monday, November 26, 2012

Gluten Free Sugar Cookies Recipe

My daughter is becoming happier and happier to help me in the kitchen, especially when she gets to decide  what we are making.  Last month, my daughter requested that we make sugar cookies, because she really wanted to be able to decorate them with frosting and sprinkles.  We had been so busy, that I really did not feel like making the cookies from scratch.  So, I decided to try using Pamela's Baking and Pancake Mix.  

I was pleasantly surprised with the way the cookies turned out.  The dough was easy to roll out using the parchment paper.  The dough held together well.  My kids were able to transfer the pre-cooked cookies from our counter to the cookie sheet without them breaking.  When cooked, the cookies were soft and chewy.  The were sturdy enough to frost, but not too hard.  We are definitely going to be making these again soon with our new Chanukah cookie cutters.  Here is the recipe I used.
   

Gluten Free Sugar Cookie Recipe

1 cup butter (2 sticks), softened
2 cups sugar
2 eggs
2 teaspoons vanilla
2 3/4 cups Pamela's Baking and Pancake Mix

In a large mixing bowl, cream butter and sugar together.  Add egg and vanilla extract and beat together.  Add Pamela's Baking & Pancake Mix and beat until it forms into a dough.  Wrap dough with plastic wrap and refrigerate for at least 30 minutes.  (We left it in the fridge for 1 hour, because we had to pick up my son from school.)

When you are ready to make the cookies, preheat the oven to 350 degrees.  Roll out the dough between two pieces of parchment paper until the dough is ~1/2-inch thick. Cut out whatever cookie shapes you like and place on a lightly greased cookie sheet.  Leave space between the cookies, because they will spread.  Bake for approximately 12-15 minutes.  The edges should be light brown.  Let cookies cool slightly and use spatula to remove from cookie sheet.

When the cookies are completely cooled, you can decorate the cookies any way you choose.  I used a store bought vanilla frosting, because that is what my children requested.  Then we decorated the cookies with colored and chocolate sprinkles.  Here are a few samples of what we made.  


I hope you enjoy making these cookies with the people you love.  Enjoy!

<3 Cassidy


Thursday, July 19, 2012

Gluten Free Chocolate Chip Muffin Recipe


Today I made a gluten free Chocolate Chip Muffin recipe.  It was really simple to make, and it was really delicious.  I found many different ways to make this recipe online, and this is my version.   I am also thinking about adding some dried fruit next time I make them.  That will hopefully add another layer of deliciousness to these amazing muffins.


Gluten Free Chocolate Chip Muffins

3 eggs
1/4 cup coconut oil
1/2 cup honey
2 1/2 tablespoons milk
1 teaspoon vanilla extract
1/2 cup chocolate chips
3 cups almond flour, firmly packed
1 rounded teaspoon baking soda

Preheat the oven to 350 degrees. Place muffin liners into the muffin tins and set aside. 

In a medium bowl, beat eggs with a stand mixer.  Then add the coconut oil, honey, milk, and vanilla extract.  Mix together and set aside.

In a large bowl, mix together the almond flour and baking soda.  Then add all of the wet ingredients and combine until it is well mixed.  Then add the chocolate chips, and stir until the chips are spread throughout the batter.

Using an ice cream scoop, spoon about one scoop into the muffin tins.  Each cup should be about 3/4 the way full.  I was able to get 14 muffins out of this batter.

Bake for approximately 20 minutes or until the tops are lightly browned and the knitting needle stuck in the center of a cupcake comes out clear.


I tried one of these muffins fresh from the oven, and it was amazing.  The muffin was moist, and the chocolate chips were melted.  It hit the spot.  I am looking forward to having one for breakfast tomorrow morning.  

 I hope you enjoy this making this recipe.

<3 Cassidy  

Thursday, May 24, 2012

Gluten Free Rainbow Cupcakes Recipe

This past weekend, we attended a picnic to celebrate the end of the Religious School year.  The Parents' Club supplied the usual picnic supplies of hot dogs, veggie burgers, rolls, and condiments.  Everyone else brought side dishes to share.  We made a cabbage slaw with apples and walnuts recipe from Whole Foods that was so simple and refreshing.  I will share my version of this recipe in another post.

I also wanted to make sure that there was a dessert for the people who were gluten free.   So, I decided to make some gluten free cupcakes.  I asked my children if they would prefer rainbow cupcakes or confetti cupcakes.  The children chose rainbow cupcakes.  I had seen a lot of rainbow cake recipes on Pinterest, but I had never tried it before.  I made rainbow cupcakes based on a vanilla cupcake recipe from Elana's Pantry book, "The Gluten Free Almond Cookbook."  Here is my recipe.


Gluten Free Rainbow Cupcakes

Cupcake:
4 large eggs, separated
1/4 cup grapeseed oil
1/2 cup honey
2 tablespoons pure vanilla extract
2 tablespoons lemon juice
4 cups almond flour
1 teaspoon salt
1 teaspoon baking soda
Food coloring

Preheat the oven to 350 degrees.  Line 18 muffin cups with paper liners.

In a large mixing bowl, whisk the egg yolks until they are pale yellow.  Then whisk in the grapeseed oil, honey, vanilla extract, and lemon juice.  Set aside.

In a cold medium bowl, whisk the egg whites until they are in stiff peaks.  Gently fold the eggs whites into the egg yolk mixture.  Set aside.

In an another medium bowl, combine the almond flour, salt, and baking soda.  Then gently fold the dry ingredients into the egg mixture.

Divide the batter into 6 different small bowls.  In the first bowl, add 18 drops of red food coloring and mix together.  In the second bowl, add 15 drops of yellow food coloring and mix together.  In the third bowl, add 15 drops of blue food coloring and mix together.  In the fourth bowl, add 15 drops of green food coloring and mix together.  In the fifth bowl, add 10 red and 6 blue drops of food coloring to make purple and mix together.  In the sixth bowl, add 12 drops of yellow and 5 drops of red to make orange and mix together.

The next step is to evenly distribute each color into all of the muffin cups.  I started with the red colored batter.  Using a regular sized spoon, I scooped a spoonful of the batter into as many muffin cups as I could.*  When I finished the red bowl, I moved onto the yellow bowl and did the same thing.  I repeated this until all of the batter had been added to the muffin cups.

Then I baked the cupcakes for about 20 minutes, until the tops were lightly browned or a metal knitting needle inserted into the center of a cupcake comes out clean.  Let the cupcakes cool in the muffin pan for 30 minutes.


Frosting:
2 oz softened butter
3 cups confectioner's sugar
2 tablespoon milk
1 teaspoon pure vanilla extract

Using a stand mixer, whisk the softened butter until it is creamy.  Add in the rest of the ingredients, and mix them together at a low speed for 1 minute.  Then increase the speed to medium for about 6 minutes or until it is light and fluffy.

Once the cupcakes are cool, spread the vanilla frosting over each cupcake.  Then dip the tops of the cupcake into a tub of rainbow sprinkles.  The cupcakes are then ready to serve.  Enjoy!


*Cooks notes:  I tried to divide the batter evenly before adding the food coloring, but I was not perfect.  Some colors seemed to fill more cups than others.  I did not care if all of the cupcakes were identical, but you can choose to be more meticulous with dividing the batter and spreading out each color.  

I am really happy about how these cupcakes turned out.  Many people were surprised to know that they were gluten free.  Even though the frosting was really sweet, the cupcake was not overly sweet.  It balanced out the sweetness factor nicely.  Adults and children both really liked them.  Next time you need something to brighten up the festivities, these cupcakes will hit the spot.  Enjoy!

~Cassidy


Tuesday, May 15, 2012

Mother's Day

I had an amazing Mother's Day!  My husband and children spoiled me with homemade surprises, an afternoon of letterboxing, and amazing food.  First, my children gave me the presents they made.  They were so proud of their crafts.  Then my husband made an omelet with feta and spinach.  My husband did not use a specific recipe.  He heated a little olive oil in the bottom of a medium skillet and then added some garlic.  He cooked the garlic until it was slightly brown, and then added the spinach.  He cooked the spinach until it was slightly wilted.  Then he added 4 beaten eggs and a little milk to the skillet pan.  He cooked the eggs until they were mostly set.  Then he added some feta cheese and cooked for another minute or two.  Then my husband folded over the omelet and cooked it for a minute or two on each side.  The omelet was so delicious.  The feta added a little bit of saltiness to the omelet, and the spinach was delicious.  My husband served this alongside with bacon and coffee.  

Once all of our bellies were full, we went letterboxing at a local State Park.  Letterboxing is like a treasure hunt, and we love doing it as a family.  Since we planned to arrive at the park around lunchtime, we decided to pack a picnic lunch.  We had hard salami, cheese, hazelnut crackers, strawberries, pineapple, and sweet peppers.  The weather was beautiful, and the lunch was delicious.

We worked up an appetite walking around the park, so my husband cooked a  tri-tip steak on the grill.  We served that alongside corn on the cob.  This is one of my family's favorite summertime meals, and it was so nice to have it on Mother's Day.  Then we finished it with carrot cake inspired by Elana's Pantry.  Everyone helped a little in making this cake, which always makes it seem so much better.  This is our recipe.


Gluten Free Carrot Cake

3 cups almond flour
2 teaspoons salt
1 teaspoon baking soda
1 tablespoon ground cinnamon
1 teaspoon ground nutmeg
2 tablespoons grapeseed oil
1/4 cup honey
5 large eggs
8 large carrots, grated
1 cup raisins
1 cup walnuts, coarsely chopped

Preheat the oven to 325 degrees.  Then grease 2 9 inch cake pans with grapeseed oil and dust with almond flour.*

In a large bowl, combine almond flour, salt, baking soda, cinnamon, and nutmeg.  Set this aside.  In a medium bowl, whisk the grapessed oil, honey, and eggs together.  Add the wet ingredients to the almond flour mixture, and then combine thoroughly.  Then fold in the carrots, raisins, and walnuts.  

Spoon the cake batter into the prepared cake pans.  Bake for 30 minutes or until a knitting needle or toothpick inserted in the center of the cakes comes out clean.  Let the cakes cool in the pans for one hour.  Remove them from the pans and frost, then serve. 

When the cakes first came out of the oven, there were a lot of lumps.  The batter did not smooth out as it cooked, because there were a lot of carrots in this recipe.  We were concerned that the cake would not taste as good because of this.  Thankfully, we were wrong.  The carrot cake was moist and not too sweet  There were just the right amount of raisins and walnuts that balanced well with the carrots.  We used cream cheese frosting, which complements the carrot cake well.  This carrot cake provided a wonderful ending for a wonderful day.   

*Cooks notes- It is really important to coat the cakes pans with a good amount of grapeseed oil, because almond flour tends to stick when baked.  

I hope you enjoy sharing this carrot cake with someone you love!

~Cassidy

Thursday, April 12, 2012

Fudge Brownies Recipe for Passover

Passover is a special time where we are supposed to remember what it was like to be a slave in Egypt, and rejoice that were are free.  We are never supposed to forget, so something like this never happens again.  My husband and I feel that this is a very important lesson to teach our children.  So, we try to set this week apart from the rest of the year.  We remove all of the chametz, bread or other leavened foods, from our refrigerator and cupboards.  Since we do not feel the need to throw away perfectly good leavened food, we just put the chametz in our freezer or in the back of the closet.  It remains out of sight until the end of Passover.  We also try to do a whole house cleanse before Passover begins.  It helps remind us how Passover is different from all other nights.

Since there are many foods that we have to abstain from eating, I try to make some special foods that are only made for Passover.  One of those recipes is a special fudge brownie.  It is not gluten free, but it has become a tradition in my family since the kids have been born.  So, I made it for my husband and children.  I am going to make macaroons for me.  I personally feel that I am getting the better end of that deal!

Front Cover

This recipe is from "A Treasury of Jewish Holiday Baking"  by Marcy Goldman (p.298).  I could not find my version of this book at Amazon, but here is a newer edition.


Decadent Fudge Brownies with Glossy Fudge Frosting

Brownies:
2 cups sugar
2 sticks (1 cup) unsalted butter
3 eggs
1 tablespoon coffee
3/4 cup cocoa powder
1/4 teaspoon salt
1 cup matzah cake meal

Glossy Fudge Frosting:
2/3 cup coffee
7 ounces chocolate chips
2 tablespoons unsalted butter, softened

Preheat the oven to 350 degrees Fahrenheit.  Grease a 7x11 inch casserole dish.  

Melt the butter in the microwave in a small bowl.  In a medium sized bowl, mix the sugar and butter together.  Then add the eggs, coffee, cocoa, salt, and matzah cake meal.  Mix all of the ingredients together.

Scoop the batter into the prepared dish.  Then bake for 20-25 minutes.  (The brownies only took 20 minutes in my convection oven).  Do not overbake them.  The brownies should be set and seem dry to the touch, but there should not be crust around the edges.  Then let them cool.

For the frosting, heat the coffee in a small saucepan.  As it comes to a boil, add the chocolate chips and reduce the heat.  Remove the pan from the heat, and stir until the chocolate is completely melted.  Cool in the refrigerator for 30 minutes.  Whisk in the softened butter and spread the frosting on top of the cooled brownies.  Cut into squares and serve.

These brownies are really rich, but my family loves them.  I hope you and your loved ones enjoy them as well.

~Cassidy   


Monday, March 12, 2012

Gluten Free Apple Berry Crisp


Gluten Free Apple Berry Crumble

1 cup blueberries
1 cup strawberries, sliced
4 apples, chopped
1 tablespoon lemon juice
1 cup water
Maple syrup

Topping:
1/2 cup gluten free oats
1/2 cup brown sugar
1/2 cup butter
1/2 teaspoon baking powder
1/4 teaspoon salt
1/2 teaspoon cinnamon


Preheat the oven to 375 degrees.

In a small saucepan, combine the blueberries, strawberries, and apples.  Add 1 cup of water, 1 tablespoon of lemon juice, and a drizzle of maple syrup.  Stir all of this together and bring the mixture to a boil.  Simmer for 5 minutes, until the fruit is slightly tender.

Combine the oats, brown sugar, baking powder, salt, cinnamon, and butter into a small bowl.

Drain the liquid from the fruit and pour it into a shallow baking dish.  Top with the oat mixture and sprinkle some extra cinnamon for a sweet and crispy coating.  Bake it for 25-30 minutes, until the topping is browned and the apples are tender.  Serve with your favorite ice cream.

My husband and I really like fruit crisps.  We decided to make this one when we had company for dinner.  It was super easy and not very time consuming.  This crisp was a hit!  Even my son liked it, and he does not like cooked fruit.   He liked it so much that he wants me to make it again as his special treat for his 1/2 birthday later this week.  I hope your family will love this recipe as much as mine does.  Enjoy!

-Cassidy

Thursday, March 8, 2012

Gluten Free Hamantashen

Purim is here, which means that it is time to make Hamantashen!  I have some amazing memories of baking hamantashen with both of my parents.  My mother and I would make the dough, and my father would roll it out on a big wooden cutting board that used to belong to my Great Grandma Bertha.  Then my mother and I would cut out the circles, spoon in the filling, and then pinch the corners together.  My mother always double checked my corners before we put them in the oven.  Now I make hamantashen with my children and my husband.  Plus, I even invite friends over to enjoy in the hamantashen making fun!  I hope that I am helping my children create wonderful memories of their own during this joyous holiday.

Last year I made gluten free hamantashen using this recipe.  These hamantashen were soft, a little chewy, and they were so delicious.  However, the recipe contains rice flour, which I do not use in my baking anymore.  So, I had to re-think how I was going to make hamantashen this year.  I found a couple of different grain free hamantashen recipes, but I liked the one from Comfy Belly the best.  


Gluten Free Hamantashen

2 1/2 cups almond flour
1/2 teaspoon salt
1 egg
8 tablespoons butter (cold and cut into pieces)
2 rounded tablespoons of honey
1 tablespoon pure vanilla extract

Put all of the ingredients into the food processor.  The food processor disperses the butter in the dough mixture.  Place the dough in a piece of plastic wrap and roll it into a log.  Freeze the dough log for about 15 minutes.

Preheat the oven to 350 degrees F.  Cover a large cookie sheet with parchment paper.  Take the dough out of the freezer, and cut the log into about 16 pieces. Take a section of the dough and roll it into a ball.  Then flatten it in between your palms to form a circle.  Place the dough circle on the parchment paper.  Place about a teaspoon of filling* in the middle of the circle.  Fold the dough around the filling into a triangle and pinch the 3 corners together.  The pinching helps keep the hamantashen together when baking.  Repeat for all sections of the dough.

Crack an egg and separate the egg whites from the yolk.  Brush the egg whites onto the edges of the hamantashen.  Bake the hamantashen for about 15 minutes or until they start to brown around the edges.  Let the hamantashen cool, and then they are ready to eat.

*Traditionally, hamantashen are filled with poppyseed filling or a stewed prune filling called lekvar.  My mother always this when we made hamantashen together.  This is her recipe.

Lekvar (prune filling)

2lbs pitted prunes
Water
2 capfuls lemon juice
salt
1/4 cup sugar
1 cup chopped walnuts
Cherry pie filling
Cinnamon

Put the prunes in a medium saucepan and then submerge the prunes completely under water.  Add 2 cupfuls of lemon juice, salt, and sugar.  Stir together all of the ingredients together.  Then cook the mixture on a medium heat until it looks syrupy (~15-30 minutes).  Combine the stewed prunes in the food processor with the chopped walnuts.  Then mix the stewed prunes with some of the cherry pie filling and cinnamon.

This year I decided not to use lekvar, because not enough people in my family will eat them.  Instead, I filled some with homemade strawberry-rhubarb jam, some with cherry pie filling, and some filled with nutella (my kids' favorite).

I hope that you enjoy making making these with your family and friends.  Enjoy!

-Cassidy

Friday, February 17, 2012

Gluten Free Triple Chocolate Chip Cookies

I hope all of you had a wonderful Valentine's Day.  Usually, my husband and I cook dinner together on Valentine's Day.  Unfortunately, Valentine's Day fell on a Tuesday this year.  The kids have martial arts on Tuesday evenings, so we have leftovers these night.  Since we did not have time to cook dinner, I decided that I would dress up a simple dessert that my whole family would love.  My immediate thought was chocolate chip cookies, so I decided to start there.  I looked through some recent blog posts from Elana's Pantry, and I saw that she had made triple chocolate chip cookies.  That sounded like a great idea, so I quickly decided to make my own triple chocolate chip cookies.  This is my recipe.


Gluten Free Triple Chocolate Chip Cookies

2 1/2 cups almond flour
1/4 cup unsweetened cocoa powder
1/2 teaspoon salt
1/2 teaspoon baking soda
1/2 cup shortening
1/4 cup honey
1 egg
1/2 cup dark chocolate chips
1/2 cup milk chocolate chips
1/2 cup white chocolate chips

Preheat the oven to 350 degrees.  Then cover 2 cookie sheets with parchment paper and set aside.  If you only have 1 cookie sheet, that will be fine.  You will need to cook these cookies in batches.

In a large mixing bowl, combine the almond flour and cocoa powder.  Stir in the salt and baking soda.  In a medium bowl, cream the shortening and honey together.  Combine the wet and dry ingredients together in the large bowl.  Then add 1 egg to help hold the cookie mixture into a nice dough consistency.  Fold in all of the chocolate chips.  Using a tablespoon, scoop the dough and form into a ball.  Then flatten it onto your palm and place onto the cookie sheet.

Bake the cookies for 7 minutes, until the tops of the cookies are slightly cracked.  Cool and serve.

I made these cookies small for this batch, because they work better for little hands.  You can make them larger if you would prefer, but they will need to cook longer.  These chocolate chip cookies have a cake like consistency.  They are rich, but they are not too sweet.  I hope your family enjoys them as much as mine did.  Enjoy!

Cassidy

Thursday, January 26, 2012

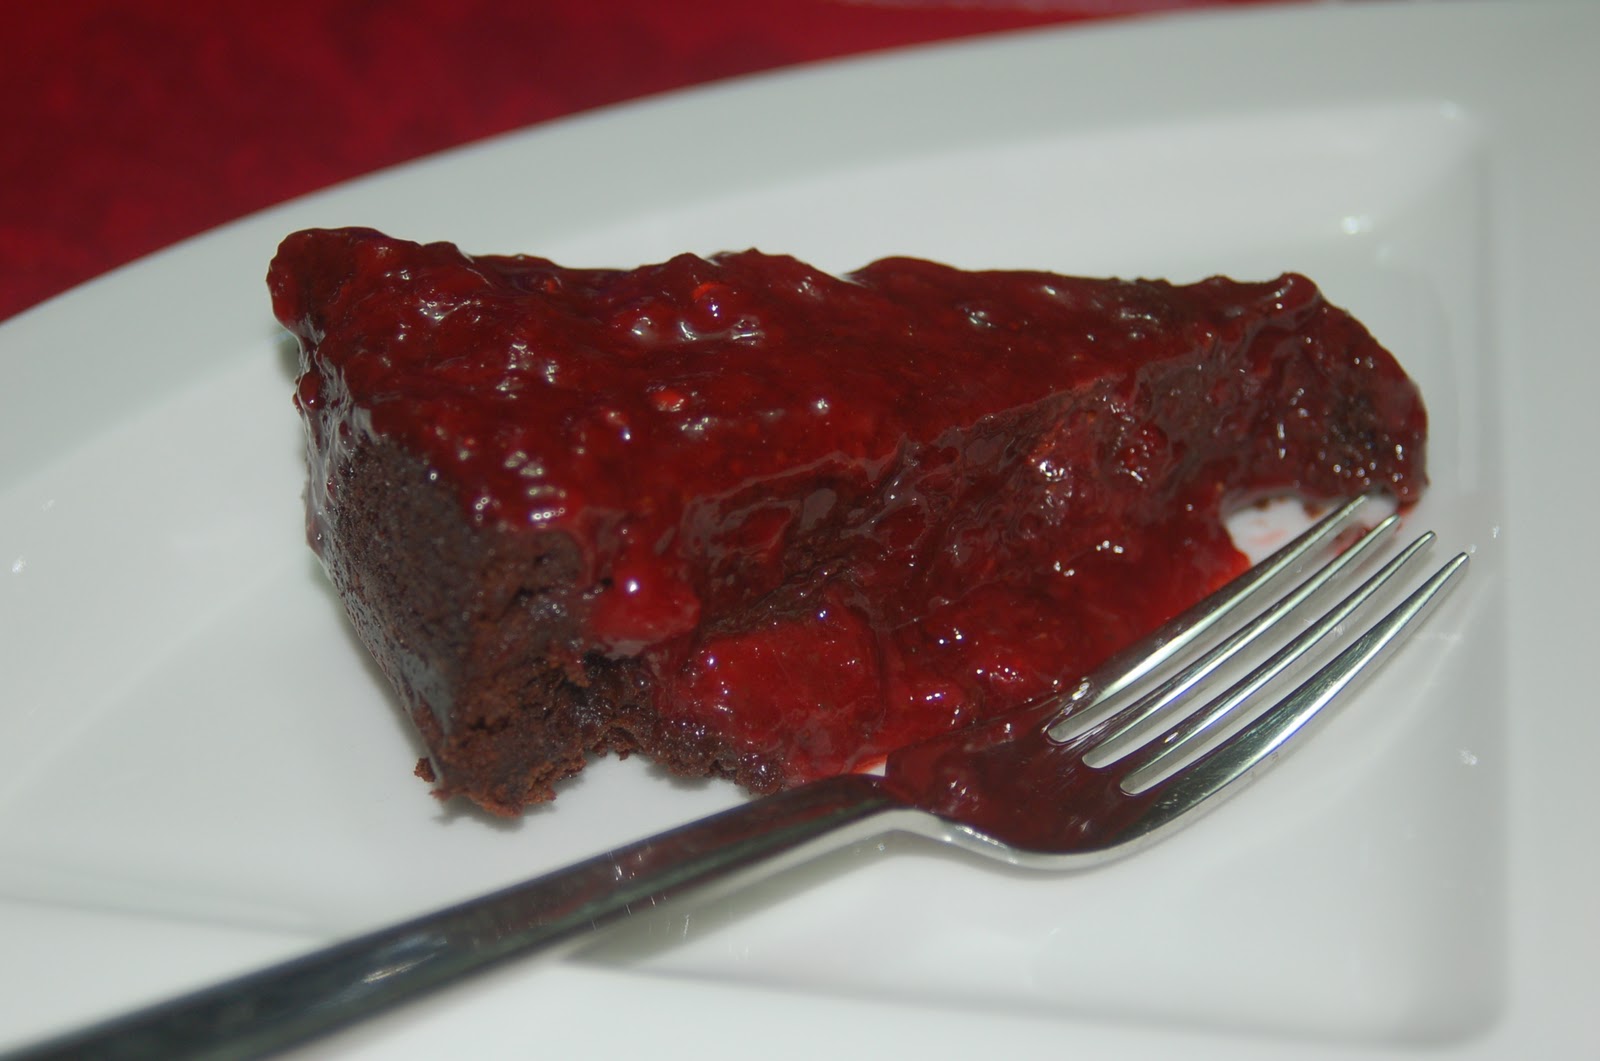
Flourless Chocolate Torte with a Strawberry Glaze

Birthdays are very special.  However, grown-ups do not typically celebrate birthdays in the same fashion as kids.  My husband just celebrated his birthday, and I had prepared to make a cake and decorate it.  When I asked him what design he wanted, he said that he did not want a decorated cake.  So, I started thinking about what I could make.  I decided to make a Flourless Chocolate Torte with a Strawberry Glaze.  This recipe is simple, but the results are decadent.


Flourless Chocolate Torte

Ingredients:
     4 ounces dark chocolate
     4 ounces milk chocolate
     2 sticks (1 cup) butter
     1 1/4 cup sugar
     6 eggs
     1 cup unsweetened cocoa

Preheat the oven to 375 degrees.  Then use grape seed oil to grease the bottom and the sides of a springform pan.  Cut out a circle of parchment paper that will fit in the bottom of the springform pan.  Place the parchment paper circle in the springform pan, and then spread a little more grape seed oil on it.  Put this off to the side.

Place the chocolate and butter in a medium saucepan over a medium-low heat.  Stir it frequently to keep the chocolate from burning on the bottom of the pan.  Remove the pot from the heat when butter and chocolate is completely melted and combined.  Transfer the melted chocolate and butter to a large mixing bowl with a whisk attachment.  Turn the mixer to a medium speed and slowly add the sugar.  Then start adding the eggs, one at a time.  When the eggs are all added, stir the cocoa gently into the batter.  Pour the batter into the prepared pan and bake for 35 minutes.

You will know the torte is cooked thoroughly when the center of the torte is firm to the touch.  Let the torte cool for 10 minutes.  Place a serving plate upside down on top of the springform pan.  Turn this over, so the plate is on the table and the springform pan is upside down.  Remove the sides of the springform pan, discard the parchment paper, and let the cake cool completely.

Then it is time to make the strawberry glaze.

Strawberry Glaze

2lbs strawberries, fresh or frozen
1/2 cup sugar
2/3 cup water
2 teaspoons lemon juice
1 tablespoon cornstarch

Combine the strawberries, sugar, water, and lemon juice in a medium saucepan on a high heat.  Stir occasionally as it comes to a rolling boil.  Reduce the heat, and let it simmer for up to 10 minutes.  As it is simmering, use a potato masher to mash the strawberries and release all of the flavors of the fruit.  When the strawberry mixture has been reduced, and the strawberries mashed to your liking, add the cornstarch.  Whisk the cornstarch until it has been dissolved and the strawberry mixture thickens into a glaze.  It usually takes 3-5 minutes.  Spoon the glaze over the Flourless Chocolate Torte.

Baker's Notes:  If you do not want your glaze to have lumps of strawberries it, there are 2 possible ways to remove them.  You can strain the strawberries chunks out of the liquid, before you use the cornstarch to thicken the glaze.  Another option is to puree the strawberry mixture in a food processor before you thicken it with cornstarch.  I did not want to strain the strawberries, so I just left the pieces of strawberries in my glaze.  If I had more time, I would have pureed the strawberry mixture, but I wanted this to be finished before my kids went to bed.

This Flourless Chocolate Torte and Strawberry Glaze is a wonderful ending to any meal.  It might even make a special dessert for a loved one on Valentine's Day.  I even shared this dessert with friends a few days after I made it, and they loved it.  I hope you get as much enjoyment in this torte as much as we did.  Enjoy!

-Cassidy

Tuesday, January 24, 2012

Gluten Free Cherry Blueberry Crisp

We had some friends over to celebrate my husband's birthday.  The dinner was wonderful, and the company was even better.  However, the few hours before the party were extremely hectic.  One of our friends was going to make a dessert, but there was a change in plans.  I had to come up with a dessert idea quickly, but I did not have any almond flour.  I ordered bulk almond flour last week, but it was not delivered until today.  So, I had to come up with something quickly.  I looked in my freezer to see if anything would jump out and bite me, and I saw bags and bags of fruit my family and I picked throughout the summer.  I spent many hours prepping the cherries, blueberries, and strawberries to freeze.  Now would be the perfect time to enjoy the ripe fruit even though it is the middle of the winter.  

My husband really likes blueberries, and I really like cherries.  I thought that combining the two fruits would make us both happy and make an amazing fruit crisp.  Now that I had a filling, I had to think about the topping.  Most of my recipes called for almond flour, but that clearly was not possible, given my lack of almond flour.  However, I had some gluten free oats in the freezer.  I decided to make my crisp with equal parts gluten free oats, butter, and brown sugar.  This is my recipe.  


Gluten Free Cherry Blueberry Crisp

Ingredients:
4 cups cherries, fresh or frozen
2 cups blueberries, fresh or frozen
1/4 cup honey
1 tablespoon lemon juice
1 tablespoon vanilla extract
4 tablespoons tapioca starch
3/4 cup brown sugar
3/4 cup butter, cold
3/4 cup gluten free oats

Preheat the oven to 350 degrees.  Put the frozen cherries and frozen blueberries into a big bowl.  Add the honey, lemon juice, vanilla extract, and tapioca starch to the fruit.  Mix all of it together and put it into a greased 2 quart baking dish.  Put the brown sugar, butter and gluten free oats into a food processor.  Combine these ingredients and crumble over the fruit mixture.  Cover the Cherry Blueberry Crisp with aluminum foil and bake for 1 hour and 15 minutes.  Uncover the Crisp and broil at 550 degrees for 5 minutes to brown.

Baker's Notes:  I used frozen fruit, because it is the wrong season for cherries and blueberries.  When you are using ripe fruit, you can likely reduce the amount of tapioca starch in half.  The food processor turned the blend of butter, oats, and brown sugar into a doughy consistency.  I crumbled it over the top of the fruit.    

This Cherry Blueberry Crisp was absolutely amazing!  I served it with a scoop of vanilla ice cream.  Sooooo yummy!  The topping was slightly crispy, and it blended well with the fruit.  Taking a bite of warm Cherry Blueberry Crisp and cold ice cream is a definite comfort food.  Enjoy!

-Cassidy


Tuesday, January 10, 2012

Gluten Free Brownies

I had a very special afternoon yesterday in my kitchen.  I got to spend it baking with 2 very special helpers, and I loved every minute of it!  Every morning after I come home from dropping my son off at school, my daughter and I and spend a few minutes snuggling on the couch.  Yesterday she looked up at me while her arms were around me, and she asked if we could make some brownies.  I knew that I was running out of almond flour, but I figured that I could create a recipe that would work with the ingredients I have at home.  So, I told her that we could.  My daughter jumped off the couch and started dancing, because she was so excited.  We decided to wait until my son got home from school too, so that we all could do it together.  I had not found a specific brownie recipe using almond flour that I really like, so I decided to experiment with a few different recipes.  Here is the recipe I used.


Gluten Free Brownies

2 cups almond flour
scant 1/2 cup almond flour (I didn't have enough to make the true half cup)
1 tablespoon tapioca starch
1/2 teaspoon salt
1 teaspoon baking soda
1/3 cup cocoa powder
1/4 cup grapeseed oil
1/2 cup maple syrup
2 eggs
1 tablespoon vanilla extract
1/2 cup chocolate chips

Preheat the oven to 350 degrees.  Grease a 8x8 square baking pan, and place a square of parchment paper on the bottom.  In a large bowl, combine the almond flour, tapioca starch, salt, baking soda, and cocoa powder.  Mix all of the ingredients together.  In a separate bowl, mix together the grapeseed oil, eggs, maple syrup, and vanilla.  Then mix the wet ingredients with the dry ingredients in the large bowl.  Add the chocolate chips and mix them into the batter.  Pour the batter into the baking pan and place it in the oven.  Bake for 20 minutes or until a knitting need comes out clean.

I hate to sound cliche, but I am not sure which was better; the brownies or the time spent with my children.  The brownies turned out really well.  There is still a strong almond taste, but the center is nice and moist.  There is a nice chocolate taste, but they are not too sweet  The kids enjoyed them, and so did my husband.  He got to come home from work to a house smelling like brownies. Yum!  You can eat the brownies by themselves or put a scoop of ice cream on top.  I hope you have fun making these with someone you love.  Enjoy!

-Cassidy

Sunday, January 1, 2012

Gluten Free Macaroons Recipe


This week I made some scrumptious gluten free coconut macaroons.  This recipe was inspired by Alton Brown from the Food Network.  I  made them for Passover last year, and I had to make a second batch because my friends and family were eating them too quickly.  Since these macaroons caused such a stir, I do not save the recipe just for Passover.  So, when I was invited to a Holiday Cookie Swap, I decided that that was a perfect excuse to make the macaroons.  Unfortunately, the party was canceled because the host's children were sick.  Then I was going to make them when my parents were visiting, but my kids wanted to make a chocolate cake with chocolate frosting for my father's birthday instead.  So, I kept putting the macaroons off.  Then a few days before New Years, I decided that this was the perfect excuse to make them.  They are really easy to make, and they turned out amazingly!  I have also topped them with melted dark chocolate, but I decided not to do that this time.   


Gluten Free Macaroons Recipe


Ingredients:
16 oz sweetened shredded coconut
2 oz sweetened condensed milk
Pinch kosher salt
1 tsp vanilla extract
4 large egg white, room temperature
5 oz sugar


Place the small deep bowl with a rounded bottom from your stand mixer, along with the whisk attachment, in the freezer for about 15 minutes.  The eggs will whip more easily when the implements are cold.

Preheat the oven to 325 degrees F.

Combine the coconut with the sweetened condensed milk, salt, and vanilla in a medium mixing bowl.

Take the bowl and whisk attachment out of the freezer and place on the mixer stand.  Beat the egg whites first at a slow speed and then gradually move up to medium until the eggs are foamy.

I have found that if you bring the eggs to room temperature, you will get more volume when beating the egg whites.  Egg whites can be brought to room temperature by setting the eggs out on the counter for at least 30 minutes in advance of your preparation.  

Gradually add the sugar and continue to whip the eggs whites until medium peaks are formed.  Do not overbeat them, they will liquify again.  When egg whites are perfectly whipped, they remain stable, even if you tip the bowl upside down.

Gently fold the egg white into the coconut mixture.  Scoop tablespoon-sized mounds onto a parchment lines cookie sheet.  I baked the cookies in a convection oven for 15-20 minutes until lightly browned.  If you are not using a convection oven, I would recommend baking the cookies for 20-25 minutes.  Once you take them out of the oven, immediately take the parchment paper off the cookie sheet.  Leave the cookies on the parchment paper, because they will solidify as they cool.


These macaroons are amazing by themselves, but if you would like to fancy them up a bit you can top them with chocolate.  I have used 12 ounces semisweet or dark chocolate chips and 1 ounce vegetable shortening.  First you need to fill a 4 quart pot with enough water to come 2 inches up the side.  Put this on a medium heat and bring it to a simmer.  Combine the chocolate chips and shortening in a small glass bowl that can set in the pot without touching the water.  Stir occasionally until the chocolate is melted, and then remove it from the heat.  Dip the tops of the cooled macaroons in the chocolate mixture and place back on the parchment paper to set.  It takes about 30 minutes for the chocolate to set.  Either way you choose to make them, I hope that your family and friends will enjoy these as much as mine.


Wishing everyone a happy and healthy New Year!  Enjoy!

-Cassidy


Tuesday, December 20, 2011

Black and White Cookie Recipe


My parents are coming to visit, and we are getting ready.  We have been cleaning, shopping, and planning.  I have been looking for ideas for what I am going to cook when my parents are here.  One of the things that I get to do when my parents come is that my husband and I get to cook together.  My parents play spend time with the grandchildren, and my husband and I get to create together with few interruptions.  The kids have a tendency to need something the minute we start cooking dinner.

One of the things I love to make is dessert.  Elana's Pantry inspired me with a post about her favorite Christmas cookies.  I saw her black and white cookies and I just had to make them, but with a little twist.  Here is my recipe:

Black and White Cookies

Ingredients:
2 1/2 cups almond flour
1/2 tsp salt
1/4 cup honey
1/4 cup grapeseed oil
1 tbsp pure vanilla extract
~1 cup chocolate chips
Vanilla icing

Combine almond flour and salt in a large bowl, and put it off to the side.  In a small bowl, combine grapeseed oil, honey, and vanilla extract.  Pour the wet ingredients into the big bowl with the dry ingredients and combine into a dough consistency.  Put dough in the freezer for 30 minutes.

Preheat oven to 350 degrees.  Place dough in between 2 sheets of parchment paper, and roll out dough to 1/4 inch thick.  I used my kids' 2 inch plastic cup to cut out the cookies, but anything that has a 2 inch diameter will work.  Place on a parchment lined cookie sheet.  When the cookie sheet is full, place it in the oven for 5-7 minutes.  Bake until the edges are browned.  The amount of time needed depends on the thickness of your cookies, thicker cookies equal longer baking time.  Cool the cookies for at least 30 minutes.

Put the chocolate chips in a microwave safe bowl.  Cook the chocolate chips in 1 minute increments, stirring occasionally, until the chocolate is melted.  Spread the chocolate on half of each cookie and set the cookies on the parchment paper to cool.  Once the chocolate has hardened, spread vanilla icing on the other half.  Place on a platter and serve.  It should make about 24 cookies.


We tried the cookies today, and they turned out great!  My parents really liked them.  The center of the cookie was soft and chewy, which is the consistency that I like my cookies.  The cookie was not overly sweet, so the frosting added to the sweetness factor, but it did not overpower it.  The cookies tasted very similar to the ones I had when I was younger.  I was really pleased with the result.  I hope you will feel the same way when you try them in your kitchen.  Enjoy!


~Cassidy